Yowel WordPress Theme

This is Yowel WordPress Theme documentation v.1 by wpthemeooster team.

Introduction - #back to top


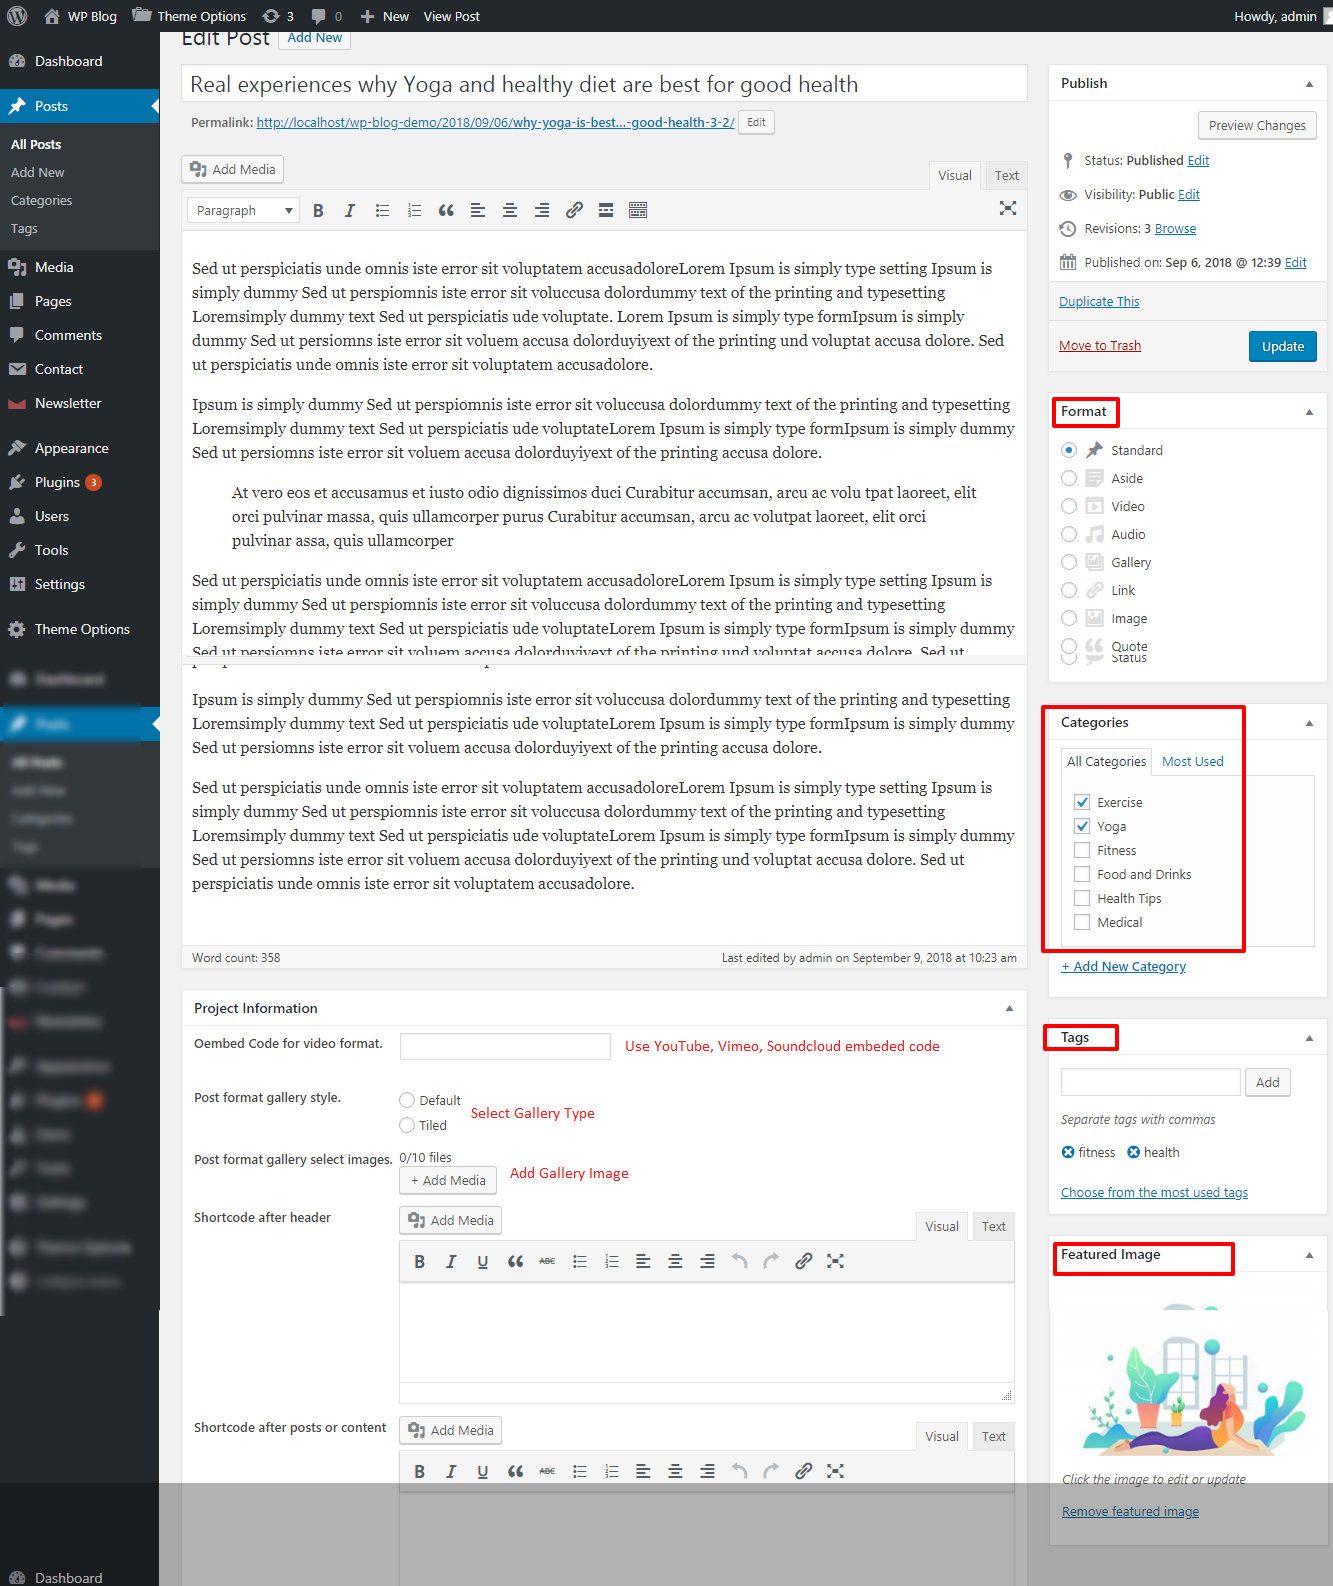
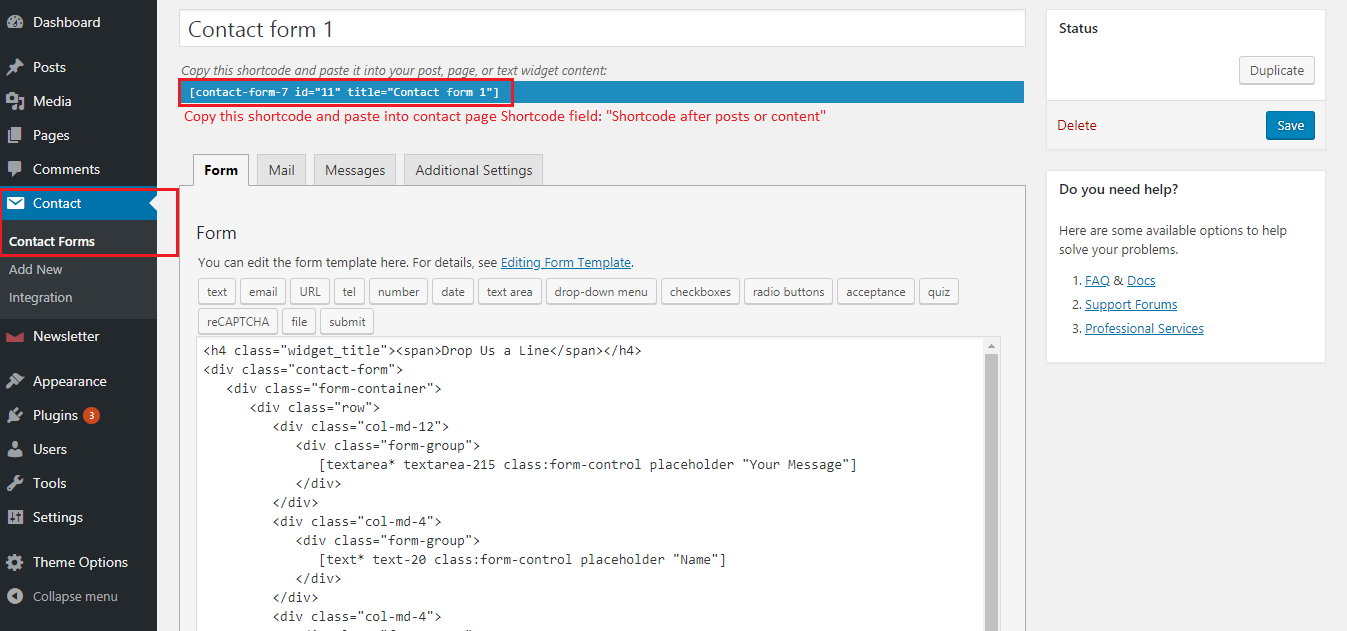
Yowel is a Multipages Bloging theme. Yowel is a clean responsive wordpress theme comes with Flexible Functionality. It includes premium wordpress plugins Contact Form 7 plugin free with theme. The theme comes with the option of contact form to allow users to contact you.

Yowel is fully compatible with latest version of WordPress, and Contact Form 7 which they give easy handling.

Upload and Activation - #back to top


1. Navigate to Appearance → Themes in your WordPress admin dashboard.

2. Click the Add New button at the top of the page then go for the Theme Upload option.

3. For the file upload, pick Theme Files / Yowel.zip in the theme package downloaded from ThemeForest and click Install Now.

4. Click Activate once the upload has finished and you're ready for the next step: Installing the Plugins.

Installing the Plugins - #back to top


Right after the theme was activated, a notification at the top of the screen will suggest to continue with the installation of the plugins recommended for getting the best our of your theme.
1. Click 'Begin installing plugins' and select all the plugins in the list.

2. Activate the Plugins one by one, you just installed.

3. After the plugins are activated, return to Dashboard.

Dummy Content Import - XML - #back to top


Yowel comes with .xml file import exactly like the original demo.
1. In your Wordpress admin dashboard, navigate to Tools → Import
2. From the page you can see the available options, click Wordpress - Run Importer (If installed, otherwise firstly need install wordpress importer)

3. Choose xml file from Dummy_Data folder

4. Assign authors

5. Import all xml file one by one like this method.

Front Page — Setup - #back to top


As default you will get Front Page And Blog Page settings automatic.

If unfortunately you not get or if you need to setup the Front page, in your WordPress Dashboard, navigate to Settings → Reading.
Assuming you already have a page named "Home", for the Front page display, select "A static page" and choose your "Home" page as the Front Page.


Home Page Creating:

Navigate Dashboard >> Pages >> Add New Page >> Select Templat Layout (Default: Blog)

In Front Page has Slider, Category List, Posts, Banner, and Related Post.

1. Slider, Related Post Items comes from Post and Category List comes from Category ID by shortcode

Menu Setup - #back to top


After installation the Yowel and after dummy-content import, Menu will be automatic selected. Find Menu, navigate WordPress admin > Appearance > Menus > Select Menu (Main Menu/Primary Menu) > Display Location: Primary Menu please check below image and learn how to do.

Post - types #back to top


Below are the custome post types which you could add data in theme.

Category: First Create category. Navigate Dashboard >> Posts >> Categories

Post: Create your Posts

Then navigate to Dashboard>> Pages>> Add new page. Create blog page.
Now navigate Dashboard>> Settings>> Reading>> Select Posts page: Blog Page (You created now)

Create Contact Form:

Navigate to Dashboard>> Contact>> Add new form.
Copy the generated shortcode and paste into contact page Shortcode field: "Shortcode after posts or content"

Create Newsletter and use it where you need (Footer Widget: 1).

newsletter

Now paste Newsletter Shortcode [newsletter_form form="1"] in Theme Option

Page Template Layout and Shortcodes Format - #back to top


Theme Options - #back to top


We listed below all our theme options. You can learn how we used Yowel WordPress theme options in below;

Navigate to Dashboard → Yowel → Theme Options :
In Theme Options has different Tabs: Header - for Logo, Social Links.
Contact Page - For Google Map API, Contact Info.
404 - for Error Page Content.
Footer - for showing differents information in footer, social icons, Instagram image, Newsletter.

Without above those has also Import / Export tab. But it is not need to get as like our demo look.

Blog Page — Setup - #back to top


At first create Blog Posts.

To start adding posts to your blog, navigate to Posts → Add New.
1. Start filling in the blanks: enter your post title, write your actual body content in the main post editing box below it.
2. As needed, select a category, add tags, select format, and make other selections from the sections below the post.
3. When your post is ready, click Publish.

Now create Blog Page: Assuming you already have a page named "Blog", if no, then create a page named "Blog": Navigate Dashboard: Pages → Add New → Blog

To setup the Blog page, in your WordPress admin panel, navigate to Settings → Reading → Posts Page: Blog

Support Help - #back to top


Please remember you have purchased a very affordable theme and you have not paid for a full-time web design agency. Occasionally we will help with small tweaks, but these requests will be put on a lower priority due to their nature. Support is also 100% optional and we provide it for your convenience, so please be patient, polite and respectful.

Please ask question via our profile email address

Support for my items includes:
  • * Responding to questions or problems regarding the item and its features
  • * Fixing bugs and reported issues
  • * Providing updates to ensure compatibility with new software versions
Item support does not include:
  • * Customization and installation services
  • * Support for third party software and plug-ins
Before seeking support, please...
  • * Make sure your question is a valid Theme Issue and not a customization request.
  • * Make sure you have read through the documentation before asking support on how to accomplish a task.
  • * Make sure to double revise the theme documentation.
  • * Try disabling any active plugins to make sure there isn't a conflict with a plugin. And if there is this way you can let us know.
  • * If you have customized your theme and now have an issue, back-track to make sure you didn't make a mistake. If you have made changes and can't find the issue, please provide us with your changelog.
  • * Almost 80% of the time we find that the solution to people's issues can be solved with a simple "Google Search". You might want to try that before seeking support. You might be able to fix the issue yourself much quicker than we can respond to your request.
  • * Make sure to state the name of the theme you are having issues with when requesting support via ThemeForest.